Azure Speech Recognition functionality of the Cognitive Service in Angular application, Let’s develop a feature in our Angular application where user can input voice and Azure Speech Cognitive Service converts input voice into text string as a result (or list of results) as well as this tutorial also helps you to integrate Azure Speech cognitive services in your Angular application.
Table of Contents
What is Transcription and Translation
The translation is the process of taking a piece of audio or voice stream and converting it into another language. Transcription, on the other hand, it is a written version of an audio or voice stream in the same language as the original.
How to integrate Azure speech recognition within Angular
let’s begin. First of all, Now go to the folder where you want to create Angular projects by using the cd command. we have to create a new Angular Applicate by using the below command in the terminal or command line prompt. I assume that you have installed Angular-CLI.
ng g new speech-recognition
wait for some time while this may take a few minutes to create the Angular application in TypeScript and install its dependencies.
Now time to install the Azure Speech SDK package (Modules) in the Angular application, Microsoft provides the Speech SDK for use with the Speech service. The Speech SDK provides consistent native Speech-to-Text and Speech Translation APIs.
The following code snippets illustrate how to install Speech SDK.
microsoft-cognitiveservices-speech-sdk
Next, we create a new service for speech recognition. This service can be reused in multiple components. let’s create the recognizer instance by creating the audio configuration and adding the code to create the speech config from the subscription as well as configuring the language.
 hasRecognitionStarted: boolean;
  speechRecognitionResult = new Subject<SpeechRecognitionResultModel>();
  speechRecognitionLanguage: string;
  private _recognizer: TranslationRecognizer;
  private _speechConfig: SpeechTranslationConfig;
  private _audioConfig: AudioConfig;
  constructor() { }

  initRecognition() {
    // listen to the device's microphone
    this._audioConfig = AudioConfig.fromDefaultMicrophoneInput()
    // use the key and region created for the Speech Services account
    this._speechConfig = SpeechTranslationConfig.fromSubscription(environment.key, environment.region);
    this._speechConfig.speechRecognitionLanguage = this.speechRecognitionLanguage;
    this._recognizer = new TranslationRecognizer(this._speechConfig, this._audioConfig);
    this._recognizer.recognized = this.handleRecognizedResponse.bind(this);
    this._recognizer.canceled = this.handleCanceled.bind(this);
  }
The startContinuousRecognitionAsync method, which enables you to work with larger streams (Audio or Video) by hooking to events that are triggered for each phrase recognized.
  startContinuousRecognition() {
    try {
      this._recognizer.startContinuousRecognitionAsync(() => {
        console.log('Recognition started');
        this.hasRecognitionStarted = true;
      });
    }
    catch (e) {
      console.log('error', e);
    }

  }
  stopRecognition() {
    this._recognizer.stopContinuousRecognitionAsync(() => {
      this._recognizer.close();
    });
  }
  private handleRecognizingResponse(res: any) {
    this.speechRecognitionResult.next({ isFnal: false, result: res.result })
  }
  private handleRecognizedResponse(res: any) {
    this.speechRecognitionResult.next({ isFnal: true, result: res.result })
  }
  private handleCanceled(res: any) {
    console.log("error",res);
  }
Now I’ll create a simple UI (Component) where users can input voice, display transcription, and translation according to error/success response from the Azure Speech cognitive service.
<h1 class="text-center container-heading">Speech To Text Conversion</h1>
<div id="toolbar">
    <button mat-mini-fab (click)="onStart()" *ngIf="!speechHasStarted" color="primary"
        matTooltip="click on the microphone to start" matTooltipShowDelay="1000">
        <mat-icon>mic_off</mat-icon>
    </button>
    <button mat-mini-fab (click)="onStop()" *ngIf="speechHasStarted" color="warn"
        matTooltip="click on the microphone to stop" matTooltipShowDelay="1000">
        <mat-icon>mic</mat-icon>
    </button>

    <button mat-mini-fab color="warn" [disabled]="!hasContent || speechHasStarted" (click)="onClearContent()"
        matTooltip="clear transcript" matTooltipShowDelay="1000">
        <mat-icon>clear_all</mat-icon>
    </button>
</div>
<div class="text-center">Click on the microphone icon and begin speaking for as long as you like.
</div>
<div class="ConversationContainer">
    <div class="transcriptContainer">
        <div class="text-center ">Transcript</div>
        <div #transcriptContainer class="transcript">{{transcript}}</div>
        <div class="text-center ">
            <mat-form-field appearance="outline">
                <mat-label>Language</mat-label>
                <mat-select required [disabled]="speechHasStarted" [(ngModel)]="selectedLanguage"
                    matTooltip="transcript language" matTooltipShowDelay="1000">
                    <mat-option></mat-option>
                    <mat-option [value]="option.value" *ngFor="let option of foods">{{ option.viewValue }}</mat-option>
                </mat-select>
            </mat-form-field>
        </div>
    </div>
    <div class="tranlationContainer">
        <div class="text-center ">Translation</div>
        <div #tranlationContainer class="translation">{{transcript}}</div>
        <div class="text-center">
            <mat-form-field appearance="outline">
                <mat-label>Language</mat-label>
                <mat-select required [disabled]="speechHasStarted" [(ngModel)]="selectedLanguage"
                    matTooltip="transcript language" matTooltipShowDelay="1000">
                    <mat-option></mat-option>
                    <mat-option [value]="option.value" *ngFor="let option of foods">{{ option.viewValue }}</mat-option>
                </mat-select>
            </mat-form-field>
        </div>
    </div>
</div> 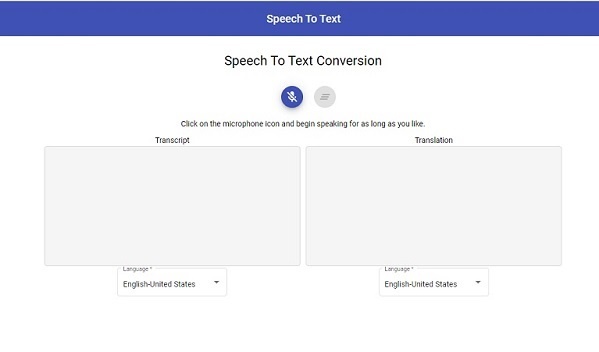
Now the application will be able to talk to you. We can call this service when the application is ready to perform a voice-driven action and define a set of voice commands to perform actions over the application.
How to get real-time transcription and translation
Here we call start voice recognition in order to run service until it’s asked to stop service. Now that we can obtain captions and translations from the Cognitive Services Speech SDK, we need to broadcast that information to all viewers who are connected to SignalR Service via WebSocket so that they can display captions in real-time.
we will cover this topic in upcoming articles… cooming soon.
Related Post
Source code available for download
The source code is available on Github of the Azure Speech Recognition in Angular 12 | Real-Time Transcription and Translation