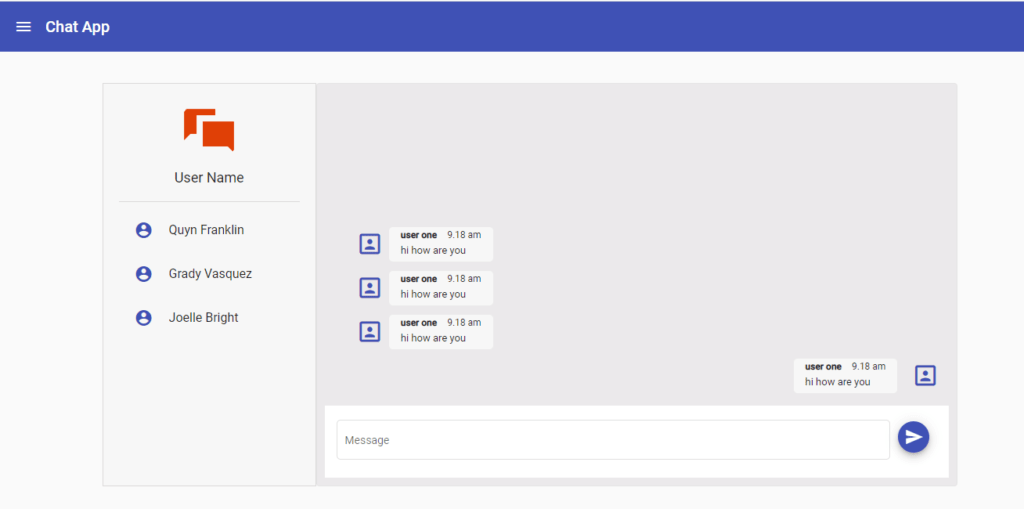
This tutorial will show you how to make an Angular Material Chat Application using SignalR (.Net Core) and Angular 11.
Table of Contents
What are we going to build?
We will build a real-time chat application that runs in the browser. It will be built upon Angular Material 11. We’ll also use SignalR which will be used to broadcast messages to clients.

The Angular material chat application architecture
.Net Core SignalR Application architecture.
├─ bin
├─ Startup.cs
├─ Program.cs
├─ appsettings.json
├─ Hubs
│ ├─ ChatHub.cs
├─ obj
└─ appsettings.Development.json
- bin is folder that holds The binary files in the bin folder are the actual executable code for your program or library.
- Startup.cs is the entry point, and it will be called after Program. cs file is executed at the application level.
- Program.cs is the entry point for the application.
- appsettings.json is an application configuration file used to store configuration settings.
- Hubs manage connections, groups, and messaging.
- ChatHub.cs is a file that chats chub API.
- obj folder that contains intermediate object files that are generated by the compiler or build system during a build.
- appsettings.Development.json is a configuration file used to store configuration settings for the Development environment.
Angular Chat Application archiecture
├───app
│ └─── components
│ └─── chat
│ ├─ chat.component.ts
│ ├─ chat.component.html
│ ├─ chat.component.scss
│ ├─ chat.module.ts
│ ├─ chat-routing.module.ts
│
│ └─── core
| └─── models
| └─── services
|
│ └─── shared
│ └──fragments
│ ├─ fotter
│ ├─ header
│ ├─ main-shell
│ ├─ sidebar
│
│ ├─ material.module.ts
│ ├─ shared.module.ts
|
├─ package.json
├─ tsconfig.json
├─ angular.json
├─ styles.scss
└─ index.html
- components/chat is the chat component module.
- /core/models is a folder that holds model fille.
- /core/services is a folder that holds service fille.
- /shared/fragments is a folder that holds header, footer sidebar component for the chat component
- /shared/shared.module.ts is a module that contains and exports shared components.
- /shared/material.module.ts is a module that exports Angular Material modules.
- package.json contains the information about npm packages installed for the project.
- tsconfig.json is the configuration of the TypeScript compiler.
- angular.json provides project-specific configuration.
- styles.scss contains the styles for the chat app.
Building the Angular Material Chat Application
- In your terminal, type ng new chatapp to create an app.
- Navigate to your application directory and type into the console:
// Add the SignalR client library.
npm i @microsoft/signalr
Writing the chat login in Chat service
The chat app logic is contained inside the components/chat/chat.component.ts, SignalrClientService, and add the following code in this (SignalrClientService.ts) file.
@Injectable({
  providedIn: 'root'
})
export class SignalrClientService {

  userName: string;
  connection: signalR.HubConnection;
  messenger = new Subject<ReceiveMessage>();
  onlineUsers = new Subject<User[]>();

  constructor() {
  }

  sendMessage(message: string) {
    return this.connection.invoke("SendMessage", this.userName, message)
  }
  openConnection() {
    this.connection = new signalR.HubConnectionBuilder()
      .withUrl(`${environment.chatURL}?username=${this.userName}`)
      .build();

    this.connection.start().then(res => {
      console.log("connected");
    });
    // add handler
    this.chatMessageHandler();
  }
  chatMessageHandler() {
    this.connection.on("ReceiveMessage", (user, message) => {
      this.messenger.next({
        userName: user, message: message, isSender: false
      });
    });
    this.connection.on("OnlineUsers", (user: User[]) => {
      //console.log("user", user);
      this.onlineUsers.next(user);
    });
  }
}
The chat component is subscribing to messages from the signalR client service (SignalrClientService) and a callback to be invoked whenever a message is received.
export class ChatComponent implements OnInit {

  message: string;
  chatContainer: ReceiveMessage[] = [];
  onlineUsers: User[];
  subscription: Subscription;

  constructor(
    public dialog: MatDialog,
    private _signalrClientService: SignalrClientService) {

    this.subscription = new Subscription();

    //subscribing chat message and online user details
    this.subscription.add(this._signalrClientService.messenger.subscribe((res: ReceiveMessage) => {
      this.chatContainer.push(res);
    }));
    this.subscription.add(this._signalrClientService.onlineUsers.subscribe((res: User[]) => {
      this.onlineUsers = res;
    }));

  }

  ngOnInit(): void {
    this.openUserDialog();
  }
  ngOnDestroy() {
    this.subscription.unsubscribe();
  }
}
After that, we’ll define a few functions to manage the UI interactions. The first is “onSendMessage()“, which is responsible for sending new messages.The chat component markup will look like this:
onSendMessage() {
    this._signalrClientService.sendMessage(this.message).then(res => {
      this.chatContainer.push({ message: this.message, userName: this._signalrClientService.userName, isSender: true })
    });
  }
  openUserDialog() {
    const dialogRef = this.dialog.open(UserDetailsComponent, { hasBackdrop: false });
    dialogRef.afterClosed().subscribe((userName: string) => {
      this.connectHub(userName);
    });
  }
  connectHub(userName: string) {
    this._signalrClientService.userName = userName;
    this._signalrClientService.openConnection();
  }
The chat component markup will look like this:
<div class="container">
    <div class="user-container">
        <div class="user-profile">
            <div class="user-pic"> </div>
            <div class="user-name">User Name</div>
        </div>
        <mat-divider></mat-divider>
        <div class="user-list">
            <mat-list *ngIf="onlineUsers">
                <mat-list-item *ngFor="let user of onlineUsers ">
                    <mat-icon mat-list-icon color="primary">account_circle</mat-icon>
                    <div mat-line>{{user.name}}</div>
                </mat-list-item>
            </mat-list>
        </div>
    </div>
    <div class="message-container">
        <mat-list>
            <mat-list-item *ngFor="let chat of chatContainer">
                <div mat-line [ngClass]="chat.isSender == true ? 'sender-message-body': 'receiver-message-body'">
                    <div class="user-icon">
                        <mat-icon mat-list-icon color="primary">portrait</mat-icon>
                    </div>
                    <div class="message-text">
                        <div class="user-date-label"><span> {{chat.userName}}</span> 9.18 am</div>
                        <div class="message">{{chat.message}}</div>
                    </div>
                </div>
            </mat-list-item>
        </mat-list>

        <div class="input-container">
            <div>
                <mat-form-field appearance="outline">
                    <mat-label>Message</mat-label>
                    <input matInput placeholder="Placeholder" class="chat-input" [(ngModel)]="message">
                </mat-form-field>
            </div>
            <div class="button-container">
                <button mat-mini-fab color="primary" (click)="onSendMessage()">
                    <mat-icon>send</mat-icon>
                </button>
            </div>
        </div>
    </div>
</div>
Writing the chat hub logic in SignalR
Create a ChatHub.cs file in the Hubs folder with the following code. “onSendMessage”, which is called when the submit button is pressed and prevents the page from reloading.
public class ChatHub : Hub
    {
        public async Task SendMessage(string user, string message)
        {
            string connectionID = Context.ConnectionId;
            await Clients.AllExcept(connectionID).SendAsync("ReceiveMessage", user, message);
        }

       public override async Task OnConnectedAsync()
        {
            var username =  Context.GetHttpContext().Request.Query["username"];
            string value = !string.IsNullOrEmpty(username.ToString()) ? username.ToString() : "default";
            string connectionID = Context.ConnectionId;
            OnlineUsers.users.Add( new User() {ConnectionId = connectionID,Name=value});

            await Clients.All.SendAsync("OnlineUsers", OnlineUsers.users);
            // the start().done callback is executed.
            await base.OnConnectedAsync();

        }
        public override async Task OnDisconnectedAsync(Exception exception)
        {
          string connectionID = Context.ConnectionId;
          var connectionIdToRemove = OnlineUsers.users.Single(r => r.ConnectionId == connectionID);
          OnlineUsers.users.Remove(connectionIdToRemove);
          await Clients.All.SendAsync("OnlineUsers", OnlineUsers.users);
          await base.OnDisconnectedAsync(exception);
        }
    }
Related Post
Source code available for download
The source code is available on GitHub for building a realtime chat app with Angular 11 and SignalR.
URL: https://github.com/decodedscript/decodedscript-realtime-chat-app-angular
