Table of Contents
Form Validations using custom validation in Angular 12
Custom validation in Angular 12, for most use cases Angular has built-in validations. If we have a validation requirement that cannot be implemented using the built-in validations, we can custom validation in Angular using reactive forms.
In this tutorial, we will see how to create the custom validation in Angular 12 with the validation rules as follows:
- Name and amount fields are should be required.
- The name field should not start and end with the whitespace.
- Amount field should not accept the negative number
- Amount field should not accept any special characters.
Next, To demonstrate how to create an Angular Reactive validator, consider the following Plan form. The Name and Amount field is marked required.
  planForm: FormGroup;
  constructor(private formBuilder: FormBuilder) {
  }
  ngOnInit(): void {
    this.initForm();
  }
  /* Create Reactive form */
  initForm() {
    this.planForm = this.formBuilder.group({
      'name': [null, Validators.required],
      'amount': [null,Validators.required]
    });
} 
How to custom validation in Angular 12 reactive form
For the custom validation, we will build from a default Angular project generated with @angular/cli.
ng new customValidationDemo This will configure a new Angular project, Next, Navigate to the newly created project directory and create new folder “validators“.
Now, create “noNegativeValueValidator.ts” and “noWhitespaceValidator.ts” classes to write custom validation logic inside the “validators” folder.
Whitespace Validation Validator
Now, let’s say we want to validate the Name field should not start and end with the white space. In the below, code snippet we are validating user input with the following validation rule.
1. Name field should be required.
2. Name field should not start and end with the whitespace.
here’s how we do that:
export function noWhitespaceValidator(control: FormControl) {

    // check if the value ends withspace
    if (control.value?.length > 0 && control.value?.endsWith(' ')) {
        return { 'whitespace': true };
    }
    // check whitespace in the value
    const isWhitespace = (control.value || '').trim().length === 0;
    const isValid = !isWhitespace;
    return isValid ? null : { 'whitespace': true };

}
Negative Number Validation Validator
Next, let’s create a custom validator for negative value validation in Angular 12.
export function noNegativeNumberValidator(control: FormControl) {
    const reg = /^\d+$/;
    const isValid = reg.test(control.value);
    return isValid ? null : { 'negativeNumber': true };
}
In the above, code snippet we are validating user input with the following validation rule.
- Amount field should not accept the negative number.
- Amount field should not accept any special characters.
Using custom Validators
We can use a custom validator just like any other built-in validation. the name field is decorated with noWhitespaceValidator validation and the amount field is decorated with noWhitespaceValidator and noNegativeNumberValidator validations.
ngOnInit(): void {
    this.initForm();
  }
  /* Create Reactive form */
  initForm() {
    this.planForm = this.formBuilder.group({
      'name': [null, [Validators.required, noWhitespaceValidator]],
      'amount': [null, [Validators.required, noWhitespaceValidator, noNegativeNumberValidator]]
    });
  }

  get name() {
    return this.planForm.get('name') as FormControl;
  }
  get amount() {
    return this.planForm.get('amount') as FormControl;
  }
To display the validation error message, we have created the nameError and amountError getter function which returns an error message based on validations.
get nameError() {
    if (this.planForm.get('name')?.hasError('required'))
      return 'Name field is required';

    if (this.planForm.get('name')?.hasError('whitespace'))
      return 'Please enter a valid Name';

    else
      return '';
  }
To display the amount files validation error message.
get amountError() {
    if (this.planForm.get('amount')?.hasError('required'))
      return 'Amount field is required';

    if (this.planForm.get('amount')?.hasError('whitespace'))
      return 'Please enter a valid Amount';

    if (this.planForm.get('amount')?.hasError('negativeNumber'))
      return 'Please enter a valid Value';

    else
      return '';
  }
Displaying the error messages for custom validator
In the below code snippet, we are using Angular material mat-form-field and mat-error to display validation messages.
<form [formGroup]="planForm" (ngSubmit)="submitForm()" novalidate autocomplete="off">
<mat-form-field appearance="outline">
<input matInput placeholder="Name" formControlName="name">
<!-- error -->
<mat-error *ngIf="!name.valid && name.touched">
{{nameError}}
</mat-error>
</mat-form-field>
<mat-form-field appearance="outline">
<input matInput placeholder="Amount" formControlName="amount">
<!-- error -->
<mat-error *ngIf="!amount.valid && amount.touched">
{{amountError}}
</mat-error>
</mat-form-field>
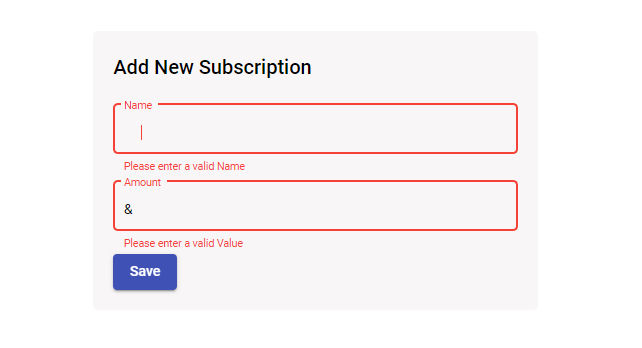
</form> If the name field has an error is submitted, it gives an error at the time of submission and similarly for the Text field as well. The following image shows how the form behaves on submitting invalid form data.
Related Post
We learned how to schedule zoom meetings with node and Angular in this tutorial. more Zoom and angular Posts.
Source code available for download
The source code is available on GitHub for the Creating Custom Validation in Angular 12 Reactive form
URL: https://github.com/decodedscript/creating-custom-validator-angular